JohnnyEnglish tutorial Make a Model for the Urt5 tutorial map
Contents
Introduction
For this tutorial I'm going to present a video I made of me making a model pipe for the CMM tutorial map using Blender 2.93.
This tutorial has no intention of attempting to teach how to use Blender to make stuff but I'll present the video, you watch it and at the end I'll list the key points.
A simple pipe
Key points
Seams
At around 2 minutes in the video I begin to consider seams, in this case I'm adding seams to help the UV Unwrap.
UV Unwrap
A UV Unwrap describes how a 2D texture should be placed on a 3D model.
The UV Unwrapping process can be achieved using automatic functions of 3d modelling software or manually.
In the video, at 2:20 I use the Blender Unwrap tool to unwrap the pipe.
At 2m 30s I duplicate that UV Map to create a LightMap
The first UV Map can be scaled to suit real-world material requirements.
Rename the mesh
At 2m 34s I rename the mesh to be SM_BigPipe_01, the name you use here will be used to reference this model, we'll use this name for the filename also.
Create a material slot
At 2m 40s I create a material slot for the model, I use the name MI_BigPipe_01
Exporting from Blender to FBX
To export your work from Blender in a format compatible with UE4, I generally use .FBX.
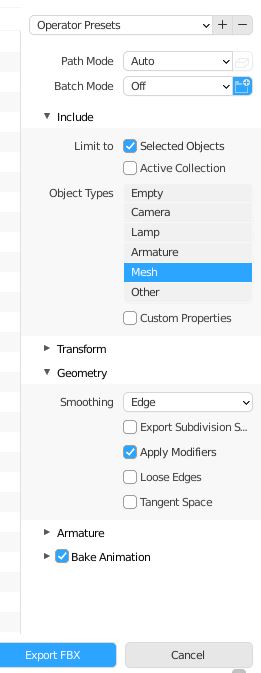
Select the parts you wish to be included (in this case the pipe) and choose File, Export to FBX.
Select the following options for the export:
- Selected objects
- Object Types: Mesh
In the Geometry category
- Smoothing: Edge
- Apply Modifiers
Deviation from these settings may cause import and light build errors and warnings in UE4
Export the .FBX with the filename SM_BigPipe_01.fbx
What next?
In the next section, we'll add this model to our tutorial map.
JohnnyEnglish tutorial Adding Models to the Urt5 tutorial map
