JohnnyEnglish tutorial Adding Models to the Urt5 tutorial map
Introduction
In the previous section we made a pipe model in Blender and have exported it to a .FBX file in a Format that UE4 prefers.
I've included a download link for this and other tutorial models, you can find these on the tutorial downloads page.
Create a new folder for props
- Create a folder in your Content/ThirdParty/TrainingRooms/Mesh folder named Props.
- Navigate into this folder, right click the large green Add/Import button just above the Content Browser and select (in this case SM_BigPipe_01.FBX) and Import it.
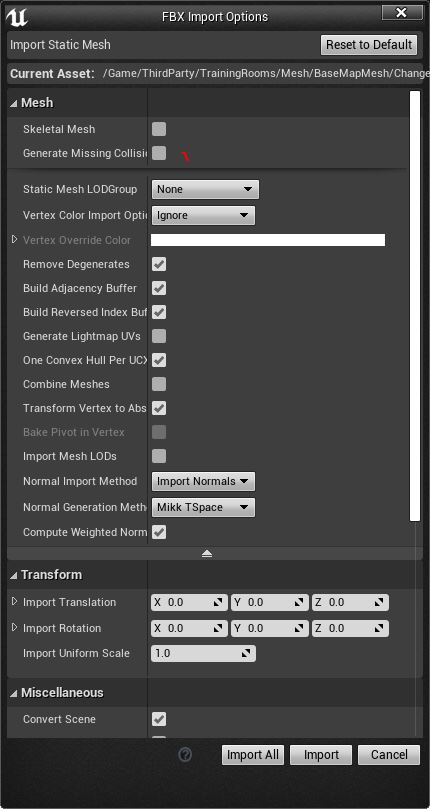
UE4 Will attempt to detect the object you're importing and will offer you an Import Options box.
Here there are several million options, depending on whether your mesh includes animations, there may be even more options, the important ones for mesh prepared for this tutorial are:
- This is not a Skeletal Mesh so uncheck this option if checked (very unlikely)
- We don't want the importer to create any collision at this stage, we'll be adding our own collision later which will smooth the map and provide a very simply collision mesh.
- Uncheck Generate LightMap UV's, we have already included lightmap UV's in Blender.
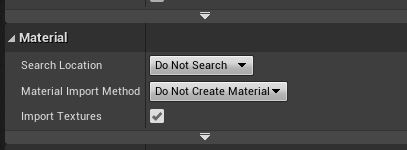
Scroll down further and open any un-opened sections, you should find the Material options. You should set the Search Location to Do not search and set the material import method to Do not Create Material
You can import the mesh, hopefully there will be no errors, no warnings. If you have errors or warnings at this stage, perhaps consider fixing them in your editor and repeat this process.
If all went well, you will have a folder props containing a single mesh named SM_BigPipe_01.

