Difference between revisions of "JohnnyEnglish tutorial Packing the tutorial map"
(Created page with "==Introduction== If you want to use your map in the real world, you will first have to cook and pack it, this is similar to packing your UrT4 maps, but different. ==Cooking...") |
(No difference)
|
Latest revision as of 06:02, 22 August 2021
Introduction
If you want to use your map in the real world, you will first have to cook and pack it, this is similar to packing your UrT4 maps, but different.
Cooking and packaging your level
Once your level is complete (or you want to test it in Urban Terror 5), you have to package your project. Since the Unreal Editor is a tool to create entire games, not just levels, there is no single-click button to just export a single level. You'll have to create a complete packaged version of 'your game project' and tell the editor to package your level in a separate file. The package containing only your level and its assets can eventually be loaded by Urban Terror 5.
In UE4, by default, the entire game project is packaged into a single .pak file. There are several methods to tell the engine to split up the content into multiple .paks. For this purpose, using a Primary Asset Label is the most sensible way to do it.
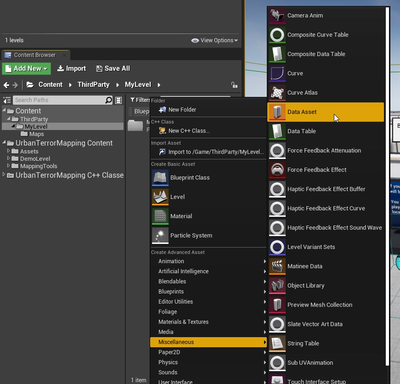
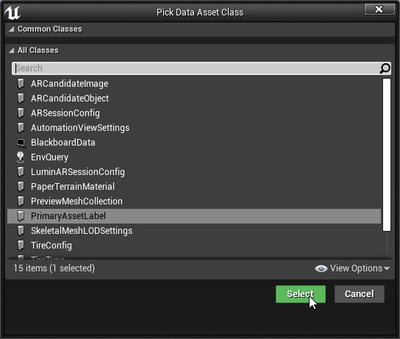
- Create a new asset label in the root folder of your level in your project's folder by right-clicking in the content browser and choosing *Miscellaneous* → *Data Asset* and selecting *PrimaryAssetLabel* in the popup.
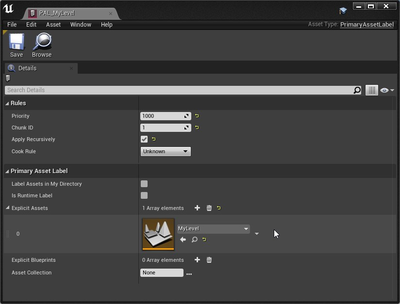
- Open the asset label and adjust the settings
- Set the *Priority* to any value higher than 0 (for example 1000).
- Tick *Apply Recursively*.
- Set the *Chunk ID* to any value higher than 0 (for example 1).
- In the *Explicit Assets* array, add a new element and select your main level.
By explicitly choosing your main level and applying the chunk ID recursively, your level and all assets referenced by it will be packaged into a separate .pak file (for example pak1), while the rest of your game project will by default end up in pak0.
In addition to making sure that your level is packaged in a separate file, you also need to make sure that no unwanted content is included in your .pak file. Actors from the mapping plugin will get packaged in your .pak file unless you exclude the mapping plugin from getting packaged. To do that, open the project settings and add `/UrbanTerrorMapping` to *Project* → *Packaging* → (Show Advanced) → *Directories to never cook*. While in this menu, also ensure that *Share Material Shader Code* is NOT ticked. All the other packaging settings are irrelevant since we are going to set them up via the project launcher.
After correctly setting up the Primary Asset Label and the directories to never cook, you can now finally package your project. If you are packaging on a Windows machine and also wish to cross-compile for Linux, Linux support can be added to the Unreal Engine by installing the appropriate toolchain; available here https://docs.unrealengine.com/en-US/Platforms/Linux/GettingStarted/index.html
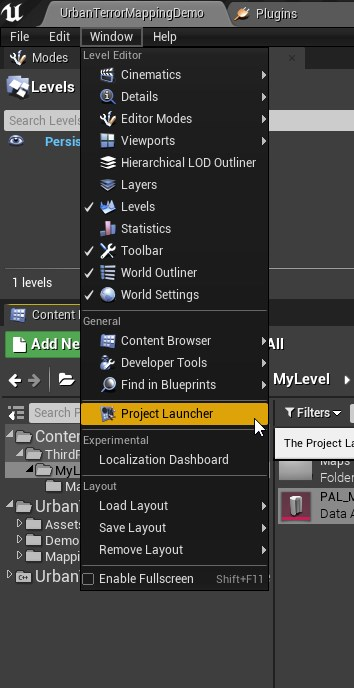
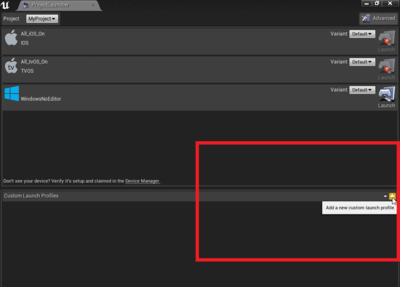
- Open the Project Launcher via Window → Project Launcher
- Create a new custom launch profile via the little + button.
- Double click on New Profile 0 to rename the profile (to for example TrainingRooms Windows Shipping).
- Under Project, select your project as the project for this launch profile. If you browse, pick your TrainingRooms.uproject file.
- Under Build, on the right hand side, select Build.
- Choose Shipping as the build configuration.
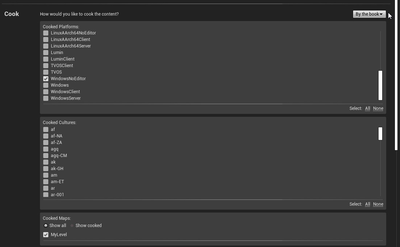
- Under Cook, on the right side, choose By the book for How would you like to cook the content?.
- Choose WindowsNoEditor for *Cooked Platforms*.
- Choose your main level file only for Cooked Maps (sub-levels will be included automatically).
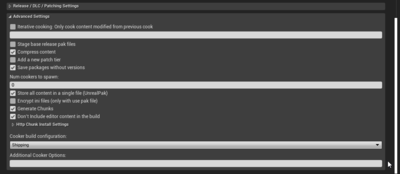
- For Advanced Settings, tick Store all content in a single file (UnrealPak).
- Under Advanced Settings, tick Generate Chunks.
- Tick Don't include editor content in the build.
- Choose Shipping as the Cooker build configuration configuration.
- Under Package, choose Package and store locally for How would you like to package the build?.
- Adjust the Local Directory Path if you wish. That's the location where the packaged project will end up in. (Default is under you `/TrainingRooms/Saved/StageBuilds/` folder)
- Under Deploy, choose Do not deploy for How would you like to deploy the build?.
When all your settings are adjusted, hit the *Back* button in the top right corner of the window. Now you can launch the profile via the button on the very right.
The Project Launcher will show you the progress and the output logs. Depending on the size and complexity of your level, as well as your system specs, this can take anywhere from a few seconds to a few hours.
When the process has finished, take a look at the directory where the build was saved. By default, it's in your project folder `\Saved\StagedBuilds`. For each platform you built, you'll find a separate folder like `WindowsNoEditor` and `LinuxNoEditor`. Navigate to `\WindowsNoEditor\TrainingRooms\Content\Paks`, where you'll find several .pak files. Pakchunk0 is the base content of your packaged project. Your level is in a pakchunk with the number you specified in the primary asset label, for example *pakchunk1*.
You need to rename your .pak file to match the name of your level, for example *TrainingRooms.pak*. This is the file that needs to be distributed to any game server and any client that wants to play the level.
There are many reasons why packaging your project might fail. It is not the purpose of this guide to help you understand and fix any errors you might get. Check the error messages in the log and refer to the Unreal Engine documentation, UE4 forums, UE4 Discord, Google or the CMM Discord.
