Difference between revisions of "The Urt5 Official Mapping plugin"
(→Working with the Urban Terror Mapping plugin) |
(→Working with the Urban Terror Mapping plugin) |
||
| Line 148: | Line 148: | ||
[[File:PIC11.png|600px]] | [[File:PIC11.png|600px]] | ||
| − | There are three folders in the mapping plugin. All the actors you need to make your level a playable Urban Terror map are in the | + | There are three folders in the mapping plugin. All the actors you need to make your level a playable Urban Terror map are in the '''MappingTools''' folder. The assets folder contains all additional assets that the tools need. Finally, the DemoLevel folder contains the ''UrbanTerrorMappingDemo Level'' and all of the needed assets for that level. You can find a showcase of all the actors and features of the plugin in the demo level: ''/UrbanTerrorMapping/DemoLevel/UrbanTerrorMappingDemo'' |
[[File:PIC12.png|600px]] | [[File:PIC12.png|600px]] | ||
Revision as of 08:28, 9 August 2021
This guide explains the steps required to install the FrozenSand - Urban Terror Mapping Plugin, and configure the Unreal Engine, to facilitate the creation of custom levels (maps) for Urban Terror 5: Resurgence.
Be aware that the Engine takes a lot of disk space (G0 GB+), and maybe 5 to 10 GB for a Level.
(This guide is for Windows. Some steps will vary on Linux.)
Contents
- 1 Getting Unreal Engine 4
- 2 Setting up Your Project
- 3 Downloading the Urban Terror Mapping Plugin
- 4 Installing the Urban Terror Mapping Plugin
- 5 Folder Structure
- 6 Working on Your Project
- 7 Available and Restricted Features
- 8 Working with the Urban Terror Mapping plugin
- 9 Cooking and packaging your level
- 10 Additional notes
- 11 Happy Mapping :)
- 12 Credits
Getting Unreal Engine 4
'Urban Terror is built upon Unreal Engine 4. To create a custom level you need to use the Unreal Editor. The first step is to download the editor. There are several ways to get the UE4 editor. The easiest is to download and install it through the Epic Games Launcher.
- Download the Epic Games Launcher: https://www.epicgames.com/store/download
- Start the Launcher.
- Log in with your existing Epic Games account or create a new account.
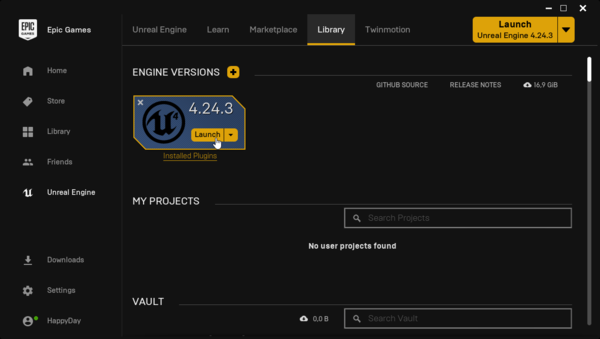
- Switch to the Library tab at the top of the launcher.
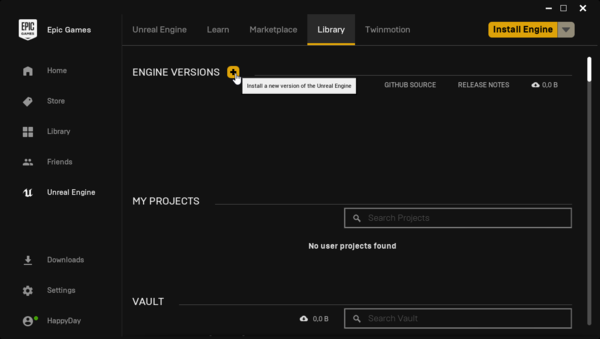
- Click the yellow plus sign to add a new engine version.
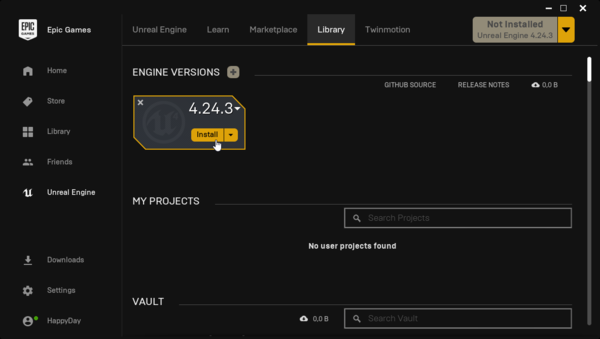
- You need to use the same version that the Mapping Plugin was released for. That's currently 4.26.x (the patch version 'x' is not relevant for creating a custom levels, so use the latest).
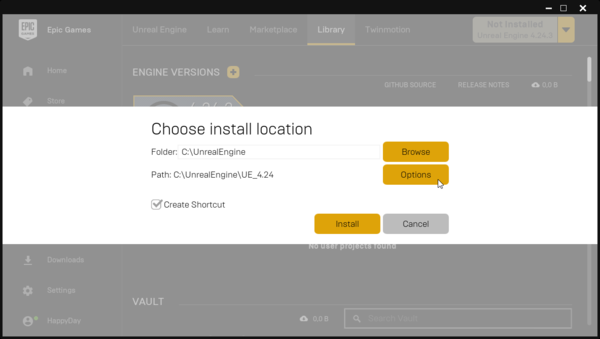
- Click Install. A new window should pop up that lets you choose the install location.
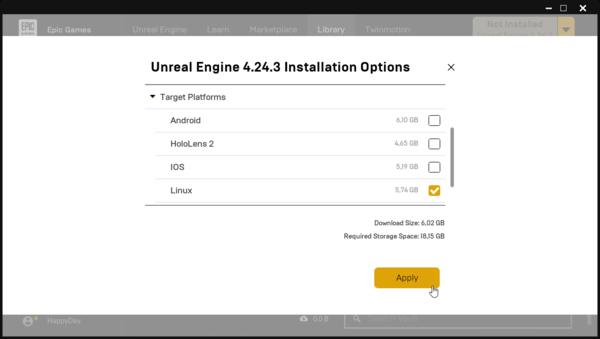
- Click the Options button. Make sure to select Linux. Everything else doesn't matter and can be unchecked to save disk space. Click Apply to confirm your choices.
- Click the Install button and wait for the Unreal Editor to download and install.
Setting up Your Project
Creating a New Project
Once you have the editor installed and ready to go, you need to create a new project.
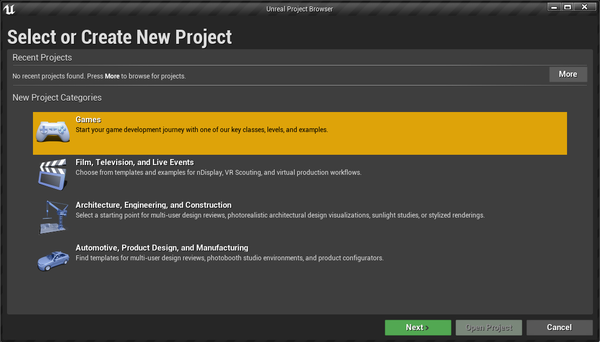
- Launch the editor by clicking on the launch button in the Epic Games Launcher, or using the desktop shortcut, and wait for the Unreal Project Browser to open.
- Select Games category and click Next.
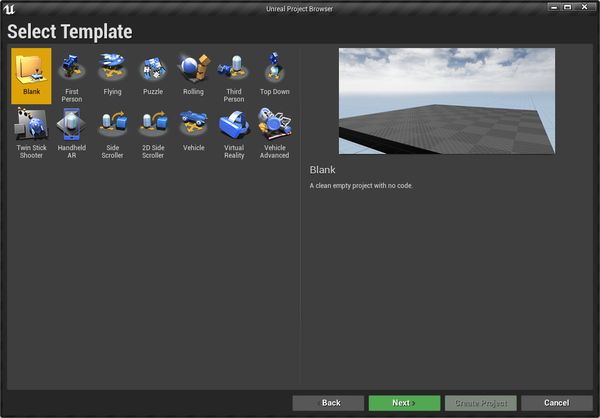
- Select the Blank template and click Next.
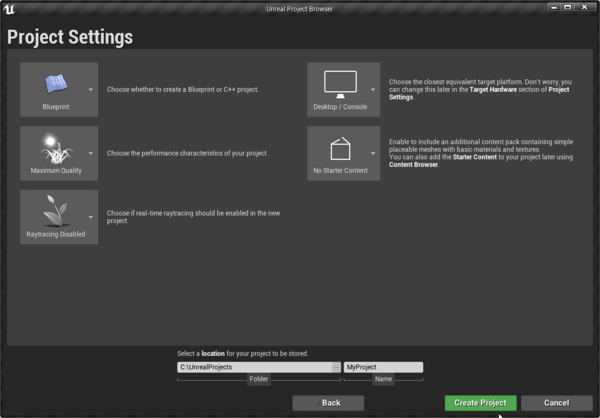
- Choose a path and a project name. The project name is not important for your level and won't appear anywhere once you have packaged your level. Choose something that makes sense to you. For this guide, we'll use MyProject.
- Adjust the project settings to be: Blueprint, Maximum Quality, Raytracing Disabled, Desktop/Console, No Starter Content.
- Click the Create Project button and wait for the Editor to open your new project.
Downloading the Urban Terror Mapping Plugin
Not yet, but soon
Installing the Urban Terror Mapping Plugin
Before started with your new project, there are some Urban Terror specific things to configure first. This includes the Urban Terror Mapping Plugin, some project settings, and the folder structure.
- Close the editor if you have it open.
- Download the Urban Terror Mapping Plugin, see above.
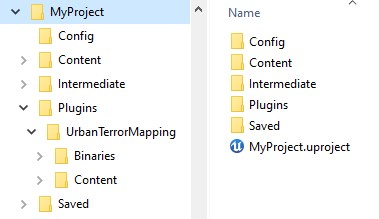
- Open your file manager and navigate to your project folder.
- Check if there is a folder called Plugins in your project folder. If there isn't, create it.
- Unpack the UrbanTerrorMappingPlugin.zip file into the *Plugins* folder of your project.
The Unreal Engine has a lot of settings. When creating levels for Urban Terror, some of your settings should match the settings the game is using. You could go into the project settings in the editor and manually change them all, but there is a faster way to do that. Project settings are stored in MyProject/Config/DefaultEngine.ini.
- Navigate to MyProject/Config/ folder and open the DefaultEngine.ini text file.
- Navigate to the MyProject/Plugins/UrbanTerrorMapping/ folder and open the readMe.md text file.
- Copy the settings text from readMe.md, and append it at the bottom of the DefaultEngine.ini file.
- Save and close the files.
This will do a few things:
- Override the default world settings class with the URTWorldSettings class from the Urban Terror Mapping plugin.
This is required. Otherwise, the game will not load your level.
- Make your project use the forward rendering path. Urban Terror uses forward shading. In order for you to be able to correctly preview your assets and level the way they would be rendered in the actual game, you need to use forward shading for your project as well.
- Adjust some navigation settings. This allows you to preview any navmesh you might use the way it will be generated by the game at runtime.
- Add all the surface type definitions the game is using to your project. This enables you to correctly apply these surface types to the materials and meshes in your level.
- Add the custom collision pre-sets used in the game.
Folder Structure
Now that your project settings are set up, it's time to open up your project again. This might take a while again. Most likely the engine needs to compile a lot of shaders because you switched to the forward renderer.
Once your project is open, take a look at the content browser.
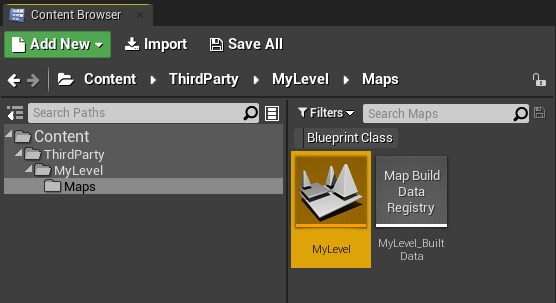
- Right-click on *Content* and create a new folder called *ThirdParty*.
- Inside the *ThirdParty* folder, create a new folder and give it a descriptive name. This is the folder that all the content of your custom level will be in. This name must also be used for your .pak file when you eventually package your level. So it is advised that you give it the name you intend to call your level. For this guide, we'll use **MyLevel**.
How you structure your project inside your level folder is totally up to you. Here are just two common ways to organize the content of your level into subfolders:
Organizing by using a folder for each asset type
   |-- Content
       |-- ThirdParty
           |-- MyLevel
               |-- Audio        // contains all audio/sound files
               |-- Effects      // contains all particle/visual effects
               |-- Maps         // contains the map file(s)
               |-- Materials    // contains all materials used in the level by all art assets
               |-- Meshes       // contains all meshes used in the level
               |-- Textures     // contains all textures used in the level by all art assets
Organizing by creating a subfolder for each art asset. Meshes, materials, and textures are thrown together into the asset's folder.
   |-- Content
       |-- ThirdParty
           |-- MyLevel
               |-- Art                // contains all meshes, materials and textures in the level, sorted into meaningful subfolders for each asset
               |   |-- Industrial
               |   |   |-- Buildings  // contains all wall, floor and other base building assets as well as their materials and textures
               |   |   |-- Machinery  // contains all machinery meshes and their materials and textures
               |   |   |-- Pipes      // contains all pipe meshes and their materials and textures
               |   |-- Nature
               |   |   |-- Rocks      // contains all rock meshes and their materials and textures
               |   |   |-- Trees      // contains all tree meshes and their materials and textures
               |-- Audio              // contains all audio/sound files
               |-- Effects            // contains all particle/visual effects
               |-- Maps               // contains the map file(s)
Keep in mind though, that there is a maximum file path length of 260 characters in UE4. So don't use too deeply nested folders, and keep your asset names reasonably short, otherwise, you won't be able to cook and package your level.
Working on Your Project
Creating a New level
With your project set up and ready to go, it's finally time to create your level.
- In the top menu bar select *File* → *New Level* → *Default*.
- Save the level in your *Maps* folder and give it the same name as you chose for the folder in the previous step.
Available and Restricted Features
Now you can start importing assets and place them in your level. You can use almost all the tools and features that Unreal Engine offers, with a few exceptions. You can use static meshes, skeletal meshes, animations, particle systems, materials, material functions, material instances, landscapes, foliage actors, sound cues, attenuation classes, behaviour trees, etc.
There is one major feature, which you cannot use though: Blueprints are a very powerful visual coding system that would allow you to alter almost any game logic and in a worst-case scenario also allows someone to run malicious code on the machines of other players who load their level. To keep the game experience consistent across all levels and to keep our players safe from harm, custom Blueprints have been disallowed. For the same reason, the Level Blueprint is disabled as well. If you package your level, and the pak file contains any Blueprint, the game will refuse to load your level. (more on the topic in *Cooking and packaging your level* later in this document). You are however allowed to use default engine Blueprints and Blueprints from the Urban Terror Mapping plugin, both of which will not actually be included in your packaged level file, but will reference content supplied with the game.
Working with the Urban Terror Mapping plugin
The Urban Terror Mapping plugin provides you with all the necessary Blueprint classes specific to the game, for example: player starts, location actors, game mode specific actors, triggers for doors, etc.
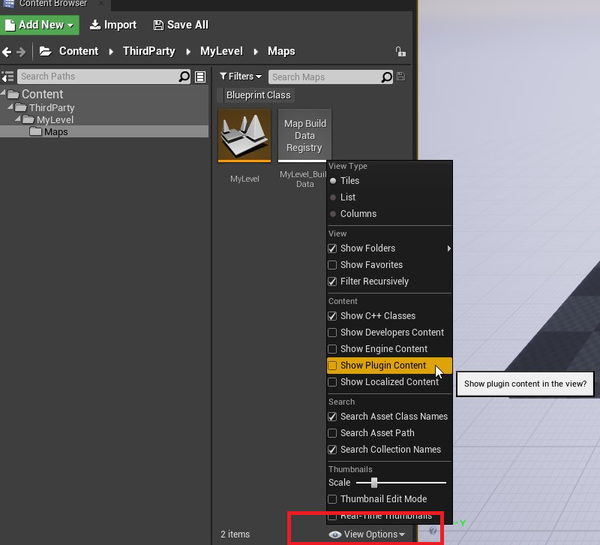
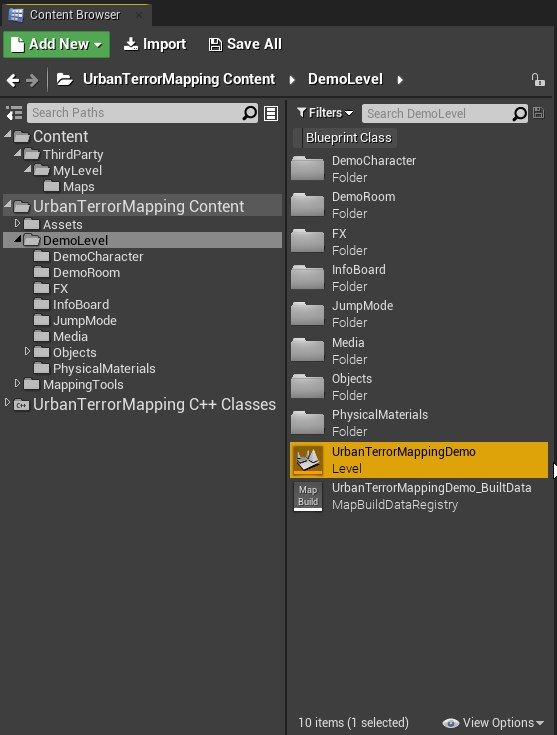
To find the plugin in the Unreal Editor, you first need to enable the Show Plugin Content flag in the View options in the content browser. The plugin content is in UrbanTerrorMapping Content
There are three folders in the mapping plugin. All the actors you need to make your level a playable Urban Terror map are in the MappingTools folder. The assets folder contains all additional assets that the tools need. Finally, the DemoLevel folder contains the UrbanTerrorMappingDemo Level and all of the needed assets for that level. You can find a showcase of all the actors and features of the plugin in the demo level: /UrbanTerrorMapping/DemoLevel/UrbanTerrorMappingDemo
When dragging one of the mapping actors into the level, you will find an UrbanTerror section in the details panel that contains all the relevant variables for you to adjust. When you hover over the variable name, a tooltip will give some additional information.
As mentioned above, most actors and features are covered by the demo level, but there is one class that needs to be mentioned here - the world settings class. If you recall, when setting up the project, we set the default world settings class name to UrbanTerrorMapping.URTWorldSettings. Open the world settings window via the menu bar in the UE4 Editor: *Window* → *World Settings*.
If you do not see an UrbanTerror section in the world settings, your level is most likely not using the correct world settings class. Make sure the project uses the URTWorldSettings class by setting it via *Project Settings* → *Engine* → *General Settings* → *Default Classes* → *World Settings Class* (This should have been already set by adjusting the DefaultEngine.ini in a previous step). If the correct world settings class is set, you need to create a new level. The world settings class is assigned to a level asset when it is created. If you have already added actors to your level you can copy and paste them between levels by selecting them in the World Outliner and using the default copy/paste hotkeys (Ctrl+C, Ctrl+V).
In the world settings, you'll find a few variables for information that will be shown in the game menu and loading screen about your level, like the map name, the author, etc. You'll also find game mode specifics. For each game mode that your level supports you need to add a new element and select the mode. Additionally, you can specify any number of sublevels per game mode. This allows you to have different map layouts, player starts, geometry or actors for each game mode. When adding additional levels via the *Levels* window, make sure their streaming method is set to *Blueprint*, which is the default. The name of sub-levels should start with you main level name, then something descriptive, for example *MyLevel_CTF*.
(Work in progress) Level settings are being moved to a separate asset, in `/UrbanTerrorMapping/MappingTools/Game/` you will find *DA_MapData_MyMap*
- Copy the *DA_MapData_MyMap* asset to your maps folder.
- Rename it to replace *MyMap* with the name of your Level.
- Open the asset and enter the same map details as used in WorldSettings.
- Save and close the MapData asset.
- Referenced *DA_MapData_MyMap* in the WorldSettings.
Cooking and packaging your level
Once your level is complete (or you want to test it in Urban Terror 5), you have to package your project. Since the Unreal Editor is a tool to create entire games, not just levels, there is no single-click button to just export a single level. You'll have to create a complete packaged version of 'your game project' and tell the editor to package your level in a separate file. The package containing only your level and its assets can eventually be loaded by Urban Terror 5.
In UE4, by default, the entire game project is packaged into a single .pak file. There are several methods to tell the engine to split up the content into multiple .paks. For this purpose, using a Primary Asset Label is the most sensible way to do it.
- Create a new asset label in the root folder of your level in your project's folder by right-clicking in the content browser and choosing *Miscellaneous* → *Data Asset* and selecting *PrimaryAssetLabel* in the popup.
- Open the asset label and adjust the settings
- Set the *Priority* to any value higher than 0 (for example 1000).
- Tick *Apply Recursively*.
- Set the *Chunk ID* to any value higher than 0 (for example 1).
- In the *Explicit Assets* array, add a new element and select your main level.
By explicitly choosing your main level and applying the chunk ID recursively, your level and all assets referenced by it will be packaged into a separate .pak file (for example pak1), while the rest of your game project will by default end up in pak0.
In addition to making sure that your level is packaged in a separate file, you also need to make sure that no unwanted content is included in your .pak file. Actors from the mapping plugin will get packaged in your .pak file unless you exclude the mapping plugin from getting packaged. To do that, open the project settings and add `/UrbanTerrorMapping` to *Project* → *Packaging* → (Show Advanced) → *Directories to never cook*. While in this menu, also ensure that *Share Material Shader Code* is NOT ticked. All the other packaging settings are irrelevant since we are going to set them up via the project launcher.
After correctly setting up the Primary Asset Label and the directories to never cook, you can now finally package your project. If you are packaging on a Windows machine and also wish to cross-compile for Linux, Linux support can be added to the Unreal Engine by installing the appropriate toolchain; available here https://docs.unrealengine.com/en-US/Platforms/Linux/GettingStarted/index.html
- Open the Project Launcher via *Window* → *Project Launcher*
- Create a new custom launch profile via the little + button.
- Double click on New Profile 0 to rename the profile (to for example "MyProject Windows Shipping").
- Under **Project**, select your project as the project for this launch profile. If you browse, pick your MyProject.uproject file.
- Under **Build**, on the right hand side, select *Build*.
- Choose *Shipping* as the build configuration .
- Under **Cook**, on the right side, choose *By the book* for *How would you like to cook the content?*.
- Choose *WindowsNoEditor* for *Cooked Platforms*.
- Choose your main level file only for *Cooked Maps* (sub-levels will be included automatically).
- For *Advanced Settings*, tick *Store all content in a single file (UnrealPak)*.
- Under *Advanced Settings*, tick *Generate Chunks*.
- Tick *Don't include editor content in the build*.
- Choose *Shipping* as the *Cooker build configuration* configuration.
- Under **Package**, choose *Package and store locally* for *How would you like to package the build?*.
- Adjust the *Local Directory Path* if you wish. That's the location where the packaged project will end up in. (Default is under you `/MyProject/Saved/StageBuilds/` folder)
- Under **Deploy**, choose *Do not deploy* for *How would you like to deploy the build?*.
When all your settings are adjusted, hit the *Back* button in the top right corner of the window. Now you can launch the profile via the button on the very right.
The Project Launcher will show you the progress and the output logs. Depending on the size and complexity of your level, as well as your system specs, this can take anywhere from a few seconds to a few hours.
When the process has finished, take a look at the directory where the build was saved. By default, it's in your project folder `\Saved\StagedBuilds`. For each platform you built, you'll find a separate folder like `WindowsNoEditor` and `LinuxNoEditor`. Navigate to `\WindowsNoEditor\MyProject\Content\Paks`, where you'll find several .pak files. Pakchunk0 is the base content of your packaged project. Your level is in a pakchunk with the number you specified in the primary asset label, for example *pakchunk1*.
You need to rename your .pak file to match the name of your level, for example *MyLevel.pak*. This is the file that needs to be distributed to any game server and any client that wants to play the level.
There are many reasons why packaging your project might fail. It is not the purpose of this guide to help you understand and fix any errors you might get. Check the error messages in the log and refer to the Unreal Engine documentation, UE4 forums, UE4 Discord, Google or the CMM Discord.
Additional notes
Performance Considerations
You are responsible for the performance of your own level. Keep in mind that there might be 10+ players in your level at the same time, while you might only test alone. Performance profiling and optimization is a very complex topic, you can read more about that here: https://docs.unrealengine.com/4.26/en-US/TestingAndOptimization/PerformanceAndProfiling/
Version/Source control
The Unreal Editor and Engine are very powerful and complex tools. While simply working on levels, the Editor is quite stable, but every once in a while there might be crashes. For your own benefit, it is advisable to use version/source control like Git, SVN or Perforce, even when working alone. Version control can be used completely offline, without the need to sync to a remote server, or online to enable collaboration. Git + Git lfs, as well as SVN, are completely free. Version/Source control can be used outside of the unreal Engine, or integrated with it, you can read more about that here: https://docs.unrealengine.com/4.26/en-US/Basics/SourceControl/
Substance Painter and other plugins
Happy Mapping :)
For example maps, models, textures and materials, take a look at the JohnnyEnglish Urt5 Mapping Tutorials
Credits
Full credits should go to FS|CMM|HappyDay, he designed and coded most of the mapping plugin. Additional code by FS|Neon and FS|HolyCrap. Thanks to all the testers who took the time to test this plugin.
