Difference between revisions of "Textures:Shaders"
| (29 intermediate revisions by 5 users not shown) | |||
| Line 1: | Line 1: | ||
| − | == | + | == Shaders == |
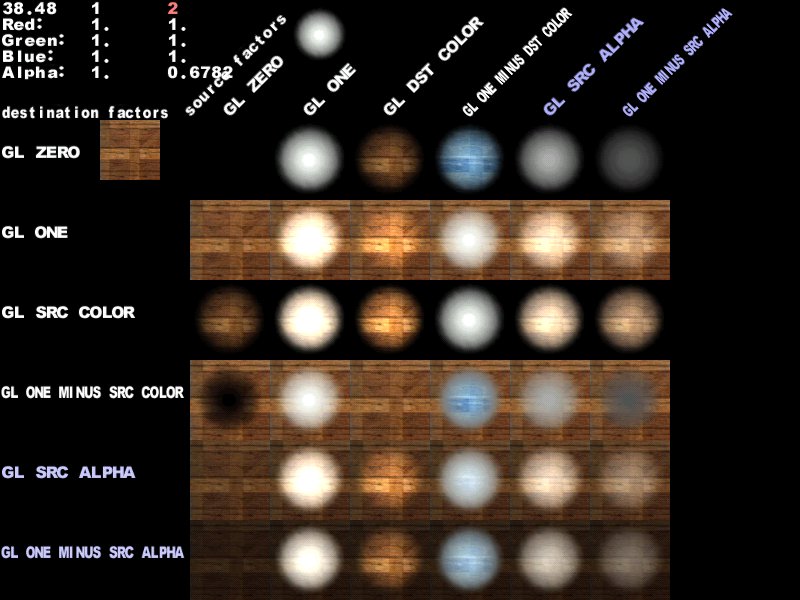
| − | + | Check out this nifty cheatsheet for blendmodes! | |
| + | [[File:blendmodes_cheatsheet.jpg]] | ||
| + | === Basics === | ||
| + | A shader is a short text string, that defines the properties of a texture. Using texture in Radiant on solid brush which has to be a simple wall doesn't require to write a shader for it. Every other surface with special attribute - it does. Shaders tells Q3 engine what kind of surface it has to deal with. Wall, water, sky, mirror, etc. You can have sky texture, but it wont act as a 'real' sky in game until you write a shader for it. | ||
| − | + | Your main shader file should always be named as your map: ut4_mymap.shader. You should keep it in your /scripts folder and also make sure, it's in your shaderlist.txt file, which is also in /scripts folder. You can call shaderlist.txt 'the main list of shaders'. If it is not on the main list, it will not be on the list in the GTK Radiant Level Editor. | |
| − | + | You must understand the difference between shader '''file''' and '''shader'''. ut4_yourmap.shader file consists shaders - it might sound complicated, but mappers use term "shader" for every single one texture with special attributes. So when someone speaks about 'shader', he speaks about a particular fragment of your shader file. | |
| − | + | ||
| + | Let's use example: | ||
| + | |||
| + | <pre> | ||
| + | textures/ut_subway/plant_bush01 | ||
| + | { | ||
| + | qer_editorimage textures/ut_subway/w2k_bush1.tga | ||
| + | surfaceparm trans | ||
| + | surfaceparm nonsolid | ||
| + | //deformVertexes autosprite2 | ||
| + | cull none | ||
| + | nopicmip | ||
| + | { | ||
| + | map textures/ut_subway/w2k_bush1.tga | ||
| + | blendFunc GL_ONE GL_ZERO | ||
| + | alphaFunc GE128 | ||
| + | depthWrite | ||
| + | rgbGen identity | ||
| + | } | ||
| + | { | ||
| + | map $lightmap | ||
| + | rgbGen identity | ||
| + | blendFunc GL_DST_COLOR GL_ZERO | ||
| + | depthFunc equal | ||
| + | } | ||
| + | } | ||
| + | |||
| + | |||
| + | textures/ut_subway/chain_link | ||
| + | { | ||
| + | qer_editorimage textures/ut_subway/fence.tga | ||
| + | surfaceparm trans | ||
| + | //surfaceparm nonsolid | ||
| + | //deformVertexes autosprite2 | ||
| + | cull none | ||
| + | nopicmip | ||
| + | { | ||
| + | map textures/ut_subway/fence.tga | ||
| + | blendFunc GL_ONE GL_ZERO | ||
| + | alphaFunc GE128 | ||
| + | depthWrite | ||
| + | rgbGen identity | ||
| + | } | ||
| + | { | ||
| + | map $lightmap | ||
| + | rgbGen identity | ||
| + | blendFunc GL_DST_COLOR GL_ZERO | ||
| + | depthFunc equal | ||
| + | } | ||
| + | } | ||
| + | </pre> | ||
| + | |||
| + | |||
| + | This is fragment of shader file for "ut4_subway" map. I pasted 2 shaders from it - for plant_bush01 and chain_link. Your shader file will also consists several shaders written by you. | ||
| + | |||
| + | |||
| + | The most basic shader will consist at least one texture and one script for it. By the time You will learn to create complicated ones, to achieve special and unique effects for your map. | ||
| + | Complete manual explaining all the parameters, strings and variables is here: [http://www.custommapmakers.org/wiki/shaders/index.html here] | ||
| + | |||
| + | == Understanding == | ||
| + | It's crucial you understand the syntax of shaders. | ||
| + | |||
| + | First you write the line how the shader should be called. You can use folder names, that's how it will appear in Radiant also. | ||
| + | |||
| + | <pre> | ||
| + | textures/ut_subway/plant_bush01 | ||
| + | { | ||
| + | } | ||
| + | </pre> | ||
| + | |||
| + | This shader can be found in the ut_subway folder in the Radiant texture browser. | ||
| + | |||
| + | Your shaders should always be put in a folder with the same or similar name of your map. A common way is to replace the ut4_ prefix of your map with aaa so it shows up right at the beginning of the list. | ||
| + | You shouldn't give shaders the same name as image files in the same directory. | ||
| + | |||
| + | (Some restrictions: Maximum of 4096 individual shader files, 8 shader stages, 8 animMap images, 3 deformations and 64 chars for the shader name) | ||
| + | |||
| + | == Conclusion == | ||
| + | |||
| + | Like famous Rayne said once: 'It's all in the shaders'. | ||
| + | |||
| + | == Good Free Shaders == | ||
| + | |||
| + | |||
| + | == Common Mistakes == | ||
| + | === Wrong syntax === | ||
| + | <pre>textures/sky/box374 | ||
| + | { | ||
| + | surfaceparm noimpact | ||
| + | surfaceparm nomarks | ||
| + | surfaceparm nolightmap | ||
| + | surfaceparm sky | ||
| + | q3map_lightimage textures/sky/box374.tga | ||
| + | qer_editorimage textures/sky/box374.tga | ||
| + | //q3map_lightsubdivide 1024 | ||
| + | //q3map_globaltexture | ||
| + | q3map_sun 1.0 0.55 0.1 725 180 30 //0.85 0.55 0.65 //0.005 0.0 0.0 25 350 20 mobb2 | ||
| + | skyparms env/box374/box374 - - | ||
| + | </pre> | ||
| + | |||
| + | This is an especially nasty case. The missing closing bracket at the end won't be recognized by the game and totally screws up the whole game. | ||
| + | |||
| + | === Wrong paths === | ||
| + | <pre>textures/sky/box374 | ||
| + | { | ||
| + | surfaceparm noimpact | ||
| + | surfaceparm nomarks | ||
| + | surfaceparm nolightmap | ||
| + | surfaceparm sky | ||
| + | q3map_lightimage textures/WOOOOOOOOT????/box374.tga | ||
| + | qer_editorimage textures/sky/box374.tga | ||
| + | q3map_surfacelight 250 //80 mobb2 | ||
| + | //q3map_lightsubdivide 1024 | ||
| + | //q3map_globaltexture | ||
| + | q3map_sun 1.0 0.55 0.1 725 180 30 //0.85 0.55 0.65 //0.005 0.0 0.0 25 350 20 mobb2 | ||
| + | skyparms env/box374/box374 - - | ||
| + | } | ||
| + | </pre> | ||
| + | [[File:Missingtexture.jpg|200px|Missing texture is marked with rainbow placeholder in game]] | ||
| + | |||
| + | |||
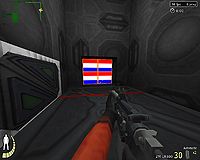
| + | In this case the skybox will show up as a missing texture because the path is wrong. | ||
| + | |||
| + | ==CMM shader tools== | ||
| + | CMM have created a simple tool to help generate both qer images and also shaders. The tool runs on a webpage and is a work in progress, any ideas for improvements are welcome. | ||
| + | |||
| + | ===qer image generator=== | ||
| + | [http://www.custommapmakers.org/shaders.php CMM shaders tool] | ||
| + | |||
| + | To create a qer image (the image used in radiant to represent your texture) simple enter the name or word that will appear on your qer image and enter an #RGB colour and click the '''create qer image''' button. | ||
| + | |||
| + | For example | ||
| + | |||
| + | [[File:LADDER.png]] | ||
| + | |||
| + | ===shader generator=== | ||
| + | |||
| + | The shader generator prompts for you to enter the name of your map, this is your shader file and will be used to create your shader names. | ||
| + | |||
| + | Select which shaders you'd like to be created by checking the available options. | ||
| + | |||
| + | Click the''' create shader set''' button, the webpage will generate your shaders in a shader file and pack this along with any base images into a .zip file which you can download. | ||
| + | |||
| + | ==Q3 shaders manual (locally hosted)== | ||
| + | [http://www.custommapmakers.org/wiki/shaders/index.html Shader Manual] | ||
[[Category:Textures]] | [[Category:Textures]] | ||
Latest revision as of 12:04, 25 July 2012
Contents
Shaders
Check out this nifty cheatsheet for blendmodes!

Basics
A shader is a short text string, that defines the properties of a texture. Using texture in Radiant on solid brush which has to be a simple wall doesn't require to write a shader for it. Every other surface with special attribute - it does. Shaders tells Q3 engine what kind of surface it has to deal with. Wall, water, sky, mirror, etc. You can have sky texture, but it wont act as a 'real' sky in game until you write a shader for it.
Your main shader file should always be named as your map: ut4_mymap.shader. You should keep it in your /scripts folder and also make sure, it's in your shaderlist.txt file, which is also in /scripts folder. You can call shaderlist.txt 'the main list of shaders'. If it is not on the main list, it will not be on the list in the GTK Radiant Level Editor.
You must understand the difference between shader file and shader. ut4_yourmap.shader file consists shaders - it might sound complicated, but mappers use term "shader" for every single one texture with special attributes. So when someone speaks about 'shader', he speaks about a particular fragment of your shader file.
Let's use example:
textures/ut_subway/plant_bush01
{
  qer_editorimage textures/ut_subway/w2k_bush1.tga
  surfaceparm trans
  surfaceparm nonsolid
  //deformVertexes autosprite2
  cull none
  nopicmip
  {
    map textures/ut_subway/w2k_bush1.tga
    blendFunc GL_ONE GL_ZERO
    alphaFunc GE128
    depthWrite
    rgbGen identity
  }
  {
    map $lightmap
    rgbGen identity
    blendFunc GL_DST_COLOR GL_ZERO
    depthFunc equal
  }
}


textures/ut_subway/chain_link
{
  qer_editorimage textures/ut_subway/fence.tga
  surfaceparm trans
  //surfaceparm nonsolid
  //deformVertexes autosprite2
  cull none
  nopicmip
  {
    map textures/ut_subway/fence.tga
    blendFunc GL_ONE GL_ZERO
    alphaFunc GE128
    depthWrite
    rgbGen identity
  }
  {
    map $lightmap
    rgbGen identity
    blendFunc GL_DST_COLOR GL_ZERO
    depthFunc equal
  }
}
This is fragment of shader file for "ut4_subway" map. I pasted 2 shaders from it - for plant_bush01 and chain_link. Your shader file will also consists several shaders written by you.
The most basic shader will consist at least one texture and one script for it. By the time You will learn to create complicated ones, to achieve special and unique effects for your map.
Complete manual explaining all the parameters, strings and variables is here: here
Understanding
It's crucial you understand the syntax of shaders.
First you write the line how the shader should be called. You can use folder names, that's how it will appear in Radiant also.
textures/ut_subway/plant_bush01
{
}
This shader can be found in the ut_subway folder in the Radiant texture browser.
Your shaders should always be put in a folder with the same or similar name of your map. A common way is to replace the ut4_ prefix of your map with aaa so it shows up right at the beginning of the list. You shouldn't give shaders the same name as image files in the same directory.
(Some restrictions: Maximum of 4096 individual shader files, 8 shader stages, 8 animMap images, 3 deformations and 64 chars for the shader name)
Conclusion
Like famous Rayne said once: 'It's all in the shaders'.
Good Free Shaders
Common Mistakes
Wrong syntax
textures/sky/box374
{
  surfaceparm noimpact
  surfaceparm nomarks
  surfaceparm nolightmap
  surfaceparm sky
  q3map_lightimage textures/sky/box374.tga
  qer_editorimage textures/sky/box374.tga
  //q3map_lightsubdivide 1024
  //q3map_globaltexture
  q3map_sun 1.0 0.55 0.1 725 180 30 //0.85 0.55 0.65 //0.005 0.0 0.0 25 350 20 mobb2
  skyparms env/box374/box374 - -
This is an especially nasty case. The missing closing bracket at the end won't be recognized by the game and totally screws up the whole game.
Wrong paths
textures/sky/box374
{
  surfaceparm noimpact
  surfaceparm nomarks
  surfaceparm nolightmap
  surfaceparm sky
  q3map_lightimage textures/WOOOOOOOOT????/box374.tga
  qer_editorimage textures/sky/box374.tga
  q3map_surfacelight 250 //80 mobb2
  //q3map_lightsubdivide 1024
  //q3map_globaltexture
  q3map_sun 1.0 0.55 0.1 725 180 30 //0.85 0.55 0.65 //0.005 0.0 0.0 25 350 20 mobb2
  skyparms env/box374/box374 - -
}
In this case the skybox will show up as a missing texture because the path is wrong.
CMM shader tools
CMM have created a simple tool to help generate both qer images and also shaders. The tool runs on a webpage and is a work in progress, any ideas for improvements are welcome.
qer image generator
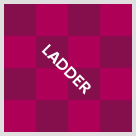
To create a qer image (the image used in radiant to represent your texture) simple enter the name or word that will appear on your qer image and enter an #RGB colour and click the create qer image button.
For example
shader generator
The shader generator prompts for you to enter the name of your map, this is your shader file and will be used to create your shader names.
Select which shaders you'd like to be created by checking the available options.
Click the create shader set button, the webpage will generate your shaders in a shader file and pack this along with any base images into a .zip file which you can download.

