Difference between revisions of "Cmc"
(→Installation) |
|||
| (22 intermediate revisions by 4 users not shown) | |||
| Line 1: | Line 1: | ||
== CMC == | == CMC == | ||
| − | CMC is a commandline tool for semi-automatic clipping of models for Q3map2 map files. The approach carried by CMC is to | + | [http://www.custommapmakers.org/resources/cmc.zip CMC] is a commandline tool for semi-automatic clipping of models for Q3map2 map files. The approach carried by CMC is to automatically insert clip brushes into a map file following a "clip model" (''ie,'' a standalone map file) provided by the user. CMC consists of a python script and is licensed under beerware revision 42. Beware, the licence will be strongly enforced. |
{{Warning|Don't blame the tool if you forgot to backup your map...}} | {{Warning|Don't blame the tool if you forgot to backup your map...}} | ||
| Line 7: | Line 7: | ||
== Usage == | == Usage == | ||
| − | === | + | === Requirements === |
CMC requires a working Python environment, and the argparse library (shipped with Python starting from version 2.7). | CMC requires a working Python environment, and the argparse library (shipped with Python starting from version 2.7). | ||
| + | |||
| + | For Python versions prior to 2.7, easy_install is a convenient way to install python library (may require root privileges). | ||
| + | |||
| + | easy_install argparse | ||
=== Installation === | === Installation === | ||
| − | Download CMC from Custom Map Makers. The Zip archive contains a one file python program. Unzip and copy it to a | + | [http://www.custommapmakers.org/resources/cmc.zip Download CMC] from Custom Map Makers. The Zip archive contains a one file python program. Unzip and copy it to a convenient location. |
=== Creating a ''clip model'' === | === Creating a ''clip model'' === | ||
| − | Create | + | Create a new map, import the model to clip for reference and place its origin at the centre of the map (''ie,'' at coordinates 0 0 0), do not rotate or scale the model. Create the clip brush around your model, once finished you can remove the model and save the ''clip model'' map. |
=== Commandline argument === | === Commandline argument === | ||
| Line 29: | Line 33: | ||
usage: cmc.py [-h] (-ls | -c model:pattern | -u clip/shader) [-o ofilename] [-d] [-v] ifile | usage: cmc.py [-h] (-ls | -c model:pattern | -u clip/shader) [-o ofilename] [-d] [-v] ifile | ||
| − | + | Q3map2 map model clipper | |
| − | + | positional arguments: | |
| − | + | ifile q3map2 map file | |
| − | + | optional arguments: | |
| − | + | -h, --help show this help message and exit | |
| − | + | -ls, --list-shaders list all shaders | |
| − | + | -c model:pattern, --clip model:pattern | |
| − | + | clip models with clip pattern file | |
| − | + | -u clip/shader, --unclip clip/shader | |
| − | + | delete brushes using "clip/shader" | |
| − | + | -o ofilename, --output ofilename | |
| − | + | output file | |
| − | + | -d, --debug | |
| − | + | -v, --version | |
| − | + | I map therefore I am | |
==== Clipping a model<br/> ==== | ==== Clipping a model<br/> ==== | ||
python cmc.py --clip models/mapobjects/mymodel/mymodel.md3:maps/clip_pattern.map \ | python cmc.py --clip models/mapobjects/mymodel/mymodel.md3:maps/clip_pattern.map \ | ||
| − | + | --output maps/mymap_clipped.map maps/mymap.map | |
maps/mymap.map | maps/mymap.map | ||
| Line 59: | Line 63: | ||
--output maps/mymap_clipped.map | --output maps/mymap_clipped.map | ||
| − | This | + | This instructs CMC to output the new map into the file "maps/mymap_clipped.map" (highly recommended). Without this option, CMC will overwrite the input file |
--clip models/mapobjects/mymodel/mymodel.md3:maps/clip_pattern.map | --clip models/mapobjects/mymodel/mymodel.md3:maps/clip_pattern.map | ||
| − | This | + | This instructs CMC to clip every instance of model "models/mapobjects/mymodel/mymodel.md3" (This is not the path to the md3 file, but the model name as it appears in the entity window in GtkRadiant), according to the clip model from file maps/clip_pattern.map. |
==== Clipping multiple models at once<br/> ==== | ==== Clipping multiple models at once<br/> ==== | ||
python cmc.py --clip model/mymodel/mymodel.md3:maps/clip_pattern.map \ | python cmc.py --clip model/mymodel/mymodel.md3:maps/clip_pattern.map \ | ||
| − | + | --clip model/mymodel/anothermodel.ase:maps/clip_anotherpattern.map | |
| − | + | --output maps/mymap_clipped.map maps/mymap.map | |
CMC accepts any number of model/clip_pattern pair using multiple "--clip" options | CMC accepts any number of model/clip_pattern pair using multiple "--clip" options | ||
| Line 79: | Line 83: | ||
=== Set up === | === Set up === | ||
| − | For this tutorial, you need to set up a map "test.map". This can be a simple rectangular room ([[Create your first room]]). Add a model into your map ([[Radiant:Using#How_to_add_a_model]]), this can be any kind of model (''eg,'' md3, ase). In | + | For this tutorial, you need to set up a map "test.map". This can be a simple rectangular room ([[Mapping:Create your first room]]). Add a model into your map ([[Radiant:Using#How_to_add_a_model]]), this can be any kind of model (''eg,'' md3, ase). In this example we have a rectangular room containing two instance of a brazier model "model/test/brazier.ase". One instance is scaled/rotated in an awkward fashion, to illustrate CMC features. |
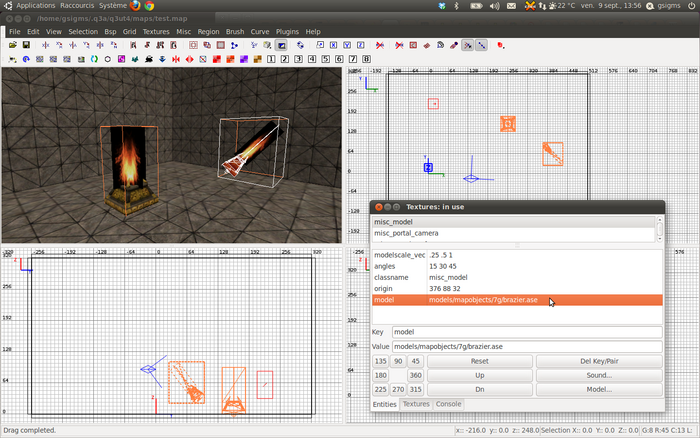
| − | [[File:Cmc-test-map.png|thumb|center|700px]] | + | [[File:Cmc-test-map.png|thumb|center|700px|Cmc-test-map.png]] |
=== Creating the clip model map === | === Creating the clip model map === | ||
| Line 89: | Line 93: | ||
Create a new map called "brazier_clip.map". | Create a new map called "brazier_clip.map". | ||
| − | To help us draw our clip brushes, import one brazier model into the map, and place the model origin at the | + | To help us draw our clip brushes, import one brazier model into the map, and place the model origin at the centre of the map (''ie,'' coordinates (0 0 0)). It is important that the model must not be rotated or scaled here. |
Now create the clip brushes around your model. It is not necessary to precisely cover every detail of the model. The purpose of a clip is to be accurate enough without being too complex. In our example, only the rough form of the base has been clipped. | Now create the clip brushes around your model. It is not necessary to precisely cover every detail of the model. The purpose of a clip is to be accurate enough without being too complex. In our example, only the rough form of the base has been clipped. | ||
| − | Apply a "clip" shader to the newly created brushes. A clip shader is provided in the "common" shader script. But for CMC, we recommend using a dedicated shader only for CMC purpose. We will later see that this will | + | Apply a "clip" shader to the newly created brushes. A clip shader is provided in the "common" shader script. But for CMC, we recommend using a dedicated shader only for CMC purpose. We will later see that this will become handy for future modifications. Here, we used a new shader called "textures/test/autoclip": |
textures/test/autoclip | textures/test/autoclip | ||
{ | { | ||
| − | + | qer_trans .4 | |
| − | + | surfaceparm nodamage | |
| − | + | surfaceparm nodraw | |
| − | + | surfaceparm nolightmap | |
| − | + | surfaceparm trans | |
| − | + | surfaceparm nomarks | |
| + | surfaceparm slick | ||
} | } | ||
| − | You can optionally remove the brazier model. CMC will ignore it. | + | [[File:Cmc-clip-model.png|thumb|center|700px|Cmc-clip-model.png]] |
| + | |||
| + | You can optionally remove the brazier model. CMC will ignore it anyway. | ||
Save the ''clip model'' map | Save the ''clip model'' map | ||
| Line 114: | Line 121: | ||
python ./cmc.py --clip:models/mapobjects/test/brazier.md3:maps/brazier_clip.map \ | python ./cmc.py --clip:models/mapobjects/test/brazier.md3:maps/brazier_clip.map \ | ||
| − | + | --output maps/test_clipped.map maps/test.map | |
If you followed this tutorial, you should now have a new map "test_clipped.map" where CMC has automatically insert the clip brushes over your model, as shown in our example. | If you followed this tutorial, you should now have a new map "test_clipped.map" where CMC has automatically insert the clip brushes over your model, as shown in our example. | ||
| + | |||
| + | [[File:Cmc-test-clip-map.png|thumb|center|700px|Cmc-test-clip-map.png]] | ||
=== Because nothing is right the first time === | === Because nothing is right the first time === | ||
| − | You might realize later that your clip model brushes need some modifications. Or you may to add new instances of your model and want CMC to clip them for you. Sadly, as of today CMC has no way of tracking models that have been clipped or replace clip brushes with a new pattern. With CMC you must first remove the clip brushes before reapplying a new clip model else you map might have duplicated clip brushes. | + | You might realize later that your clip model brushes need some modifications. Or you may want to add new instances of your model and want CMC to clip them for you. Sadly, as of today CMC has no way of tracking models that have been clipped or replace clip brushes with a new pattern. With CMC you must first remove the clip brushes before reapplying a new clip model else you map might have duplicated clip brushes. |
| − | Hopefully, if you followed this tutorial recommendation to use a dedicated clip shader, CMC will help you do that. CMC allows you to remove every brush that | + | Hopefully, if you followed this tutorial recommendation to use a dedicated clip shader, CMC will help you do that. CMC allows you to remove every brush that has at least one face with a given shader from you map. To do that run the following command. |
python ./cmc.py --unclip textures/test/autoclip \ | python ./cmc.py --unclip textures/test/autoclip \ | ||
| − | + | -o maps/test_unclipped.map maps/test_clipped.map | |
| + | |||
| + | == Maps built with CMC == | ||
| + | |||
| + | * '''Azurea''': ut4_azurea_a1 is a jump map and the main motivation for building CMC. The flameholders that are also used in this tutorial have been clipped with CMC. | ||
| + | * '''Bus Stop''': ut4_bus_stop_b2 is a frag map by JohnnyEnglish. Johnny used CMC to clip various models (buses, seats, garbages). | ||
| + | |||
| + | Most recently | ||
| + | |||
| + | * '''Nightmare xmas''', a map with a lot of small models (trim, coffins, lights. presents), 12 clips used with 170 models | ||
Latest revision as of 05:11, 23 January 2018
Contents
CMC
CMC is a commandline tool for semi-automatic clipping of models for Q3map2 map files. The approach carried by CMC is to automatically insert clip brushes into a map file following a "clip model" (ie, a standalone map file) provided by the user. CMC consists of a python script and is licensed under beerware revision 42. Beware, the licence will be strongly enforced.
| |
Don't blame the tool if you forgot to backup your map... |
Usage
Requirements
CMC requires a working Python environment, and the argparse library (shipped with Python starting from version 2.7).
For Python versions prior to 2.7, easy_install is a convenient way to install python library (may require root privileges).
easy_install argparse
Installation
Download CMC from Custom Map Makers. The Zip archive contains a one file python program. Unzip and copy it to a convenient location.
Creating a clip model
Create a new map, import the model to clip for reference and place its origin at the centre of the map (ie, at coordinates 0 0 0), do not rotate or scale the model. Create the clip brush around your model, once finished you can remove the model and save the clip model map.
Commandline argument
Getting help
python cmc.py --help
display a help message:
 usage: cmc.py [-h] (-ls | -c model:pattern | -u clip/shader) [-o ofilename] [-d] [-v] ifile

 Q3map2 map model clipper

 positional arguments:
   ifile                 q3map2 map file

 optional arguments:
   -h, --help            show this help message and exit
   -ls, --list-shaders   list all shaders
   -c model:pattern, --clip model:pattern
              clip models with clip pattern file
   -u clip/shader, --unclip clip/shader
              delete brushes using "clip/shader"
   -o ofilename, --output ofilename
              output file
   -d, --debug
   -v, --version

  I map therefore I am
Clipping a model
   python cmc.py --clip models/mapobjects/mymodel/mymodel.md3:maps/clip_pattern.map \
     --output maps/mymap_clipped.map maps/mymap.map
maps/mymap.map
This is the path to the map to process.
--output maps/mymap_clipped.map
This instructs CMC to output the new map into the file "maps/mymap_clipped.map" (highly recommended). Without this option, CMC will overwrite the input file
--clip models/mapobjects/mymodel/mymodel.md3:maps/clip_pattern.map
This instructs CMC to clip every instance of model "models/mapobjects/mymodel/mymodel.md3" (This is not the path to the md3 file, but the model name as it appears in the entity window in GtkRadiant), according to the clip model from file maps/clip_pattern.map.
Clipping multiple models at once
   python cmc.py --clip model/mymodel/mymodel.md3:maps/clip_pattern.map \
     --clip model/mymodel/anothermodel.ase:maps/clip_anotherpattern.map
     --output maps/mymap_clipped.map maps/mymap.map
CMC accepts any number of model/clip_pattern pair using multiple "--clip" options
Tutorial
In this tutorial, we will cover how to use CMC in order to clip a model semi-automatically. We will show how to do so in a way that facilitates modifying or removing the clip brushes even after modification of the map file.
Set up
For this tutorial, you need to set up a map "test.map". This can be a simple rectangular room (Mapping:Create your first room). Add a model into your map (Radiant:Using#How_to_add_a_model), this can be any kind of model (eg, md3, ase). In this example we have a rectangular room containing two instance of a brazier model "model/test/brazier.ase". One instance is scaled/rotated in an awkward fashion, to illustrate CMC features.
Creating the clip model map
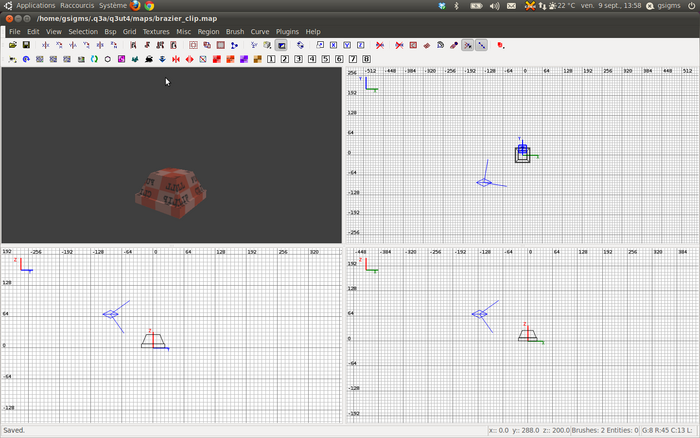
Let us now create a clip model map. A clip model map is a set of brushes that CMC is going to use as a pattern to clip our brazier model into "test.map".
Create a new map called "brazier_clip.map".
To help us draw our clip brushes, import one brazier model into the map, and place the model origin at the centre of the map (ie, coordinates (0 0 0)). It is important that the model must not be rotated or scaled here.
Now create the clip brushes around your model. It is not necessary to precisely cover every detail of the model. The purpose of a clip is to be accurate enough without being too complex. In our example, only the rough form of the base has been clipped.
Apply a "clip" shader to the newly created brushes. A clip shader is provided in the "common" shader script. But for CMC, we recommend using a dedicated shader only for CMC purpose. We will later see that this will become handy for future modifications. Here, we used a new shader called "textures/test/autoclip":
   textures/test/autoclip
  {
    qer_trans .4
    surfaceparm nodamage
    surfaceparm nodraw
    surfaceparm nolightmap
    surfaceparm trans
    surfaceparm nomarks
    surfaceparm slick
  }
You can optionally remove the brazier model. CMC will ignore it anyway.
Save the clip model map
Clipping the map
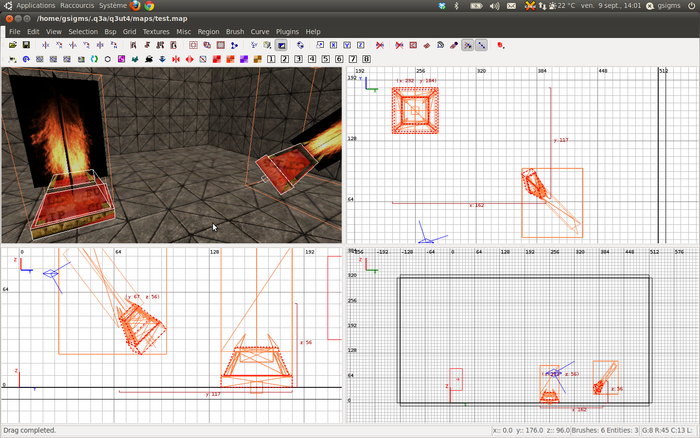
From this point, let us assume you extracted the CMC script into your "q3ut4" directory. Relative to the current directory, your map file path should be "maps/test.map" and your clip model map should be "maps/brazier_clip.map" run the following command:
   python ./cmc.py --clip:models/mapobjects/test/brazier.md3:maps/brazier_clip.map \
    --output maps/test_clipped.map maps/test.map
If you followed this tutorial, you should now have a new map "test_clipped.map" where CMC has automatically insert the clip brushes over your model, as shown in our example.
Because nothing is right the first time
You might realize later that your clip model brushes need some modifications. Or you may want to add new instances of your model and want CMC to clip them for you. Sadly, as of today CMC has no way of tracking models that have been clipped or replace clip brushes with a new pattern. With CMC you must first remove the clip brushes before reapplying a new clip model else you map might have duplicated clip brushes.
Hopefully, if you followed this tutorial recommendation to use a dedicated clip shader, CMC will help you do that. CMC allows you to remove every brush that has at least one face with a given shader from you map. To do that run the following command.
   python ./cmc.py --unclip textures/test/autoclip \
    -o maps/test_unclipped.map maps/test_clipped.map
Maps built with CMC
- Azurea: ut4_azurea_a1 is a jump map and the main motivation for building CMC. The flameholders that are also used in this tutorial have been clipped with CMC.
- Bus Stop: ut4_bus_stop_b2 is a frag map by JohnnyEnglish. Johnny used CMC to clip various models (buses, seats, garbages).
Most recently
- Nightmare xmas, a map with a lot of small models (trim, coffins, lights. presents), 12 clips used with 170 models


