Difference between revisions of "Mapping:HowTo:Adding light to models"
(→Working with model) |
|||
| Line 9: | Line 9: | ||
md3 models are the native format for Q3 engine which Urban Terror uses. | md3 models are the native format for Q3 engine which Urban Terror uses. | ||
| − | When you unpack the model (to mapping/models/mapobjects/cmm_lightbulb, you will find textures inside, md3 file which is the actual models and sometimes a .qc file. | + | When you unpack the model (to mapping/models/mapobjects/cmm_lightbulb), you will find textures inside, md3 file which is the actual models and sometimes a .qc file. |
You need to open in simple text editor (like notepad for example) .qc file with the name corresponding to the model you want to make shine - in our case - lightbulb.qc | You need to open in simple text editor (like notepad for example) .qc file with the name corresponding to the model you want to make shine - in our case - lightbulb.qc | ||
Revision as of 11:40, 29 August 2011
Adding light to models is fairly easy. All You have to do is write a shader for the part that will be emitting light.
Working with model
Every good model has obvious light parts textures separated.
We will use the tutorial lightbulb model available here. A great many other models are made this way, for example the Suburbs street light model. You can get that here, from Black Rayne Studios.
md3 models are the native format for Q3 engine which Urban Terror uses.
When you unpack the model (to mapping/models/mapobjects/cmm_lightbulb), you will find textures inside, md3 file which is the actual models and sometimes a .qc file.
You need to open in simple text editor (like notepad for example) .qc file with the name corresponding to the model you want to make shine - in our case - lightbulb.qc
$model "models/mapobjects/cmm_lightbulb/lightbulb.md3"
$frames 1 30
$flags 0
$numskins 0
$mesh "models/mapobjects/cmm_lightbulb/plastic"
$skin "models/mapobjects/cmm_lightbulb/plastic.jpg"
$flags 0
$mesh "models/mapobjects/cmm_lightbulb/bulb"
$skin "models/mapobjects/cmm_lightbulb/bulb.jpg"
$flags 0
What is important for you is the 'skins' line containing names of the textures used. You can easily identify the texture that is supposed to be the light emitter - in our case - bulb.jpg
We need to create a shader which will replace this skin - of the same name.
Working with shader
Now we can write a shader in order to emit light from one particular texture. I suggest that shader:
models/mapobjects/cmm_lightbulb/bulb
{
	qer_editorimage textures/myfirstmap/model_bulb.tga
	light 1
	surfaceparm nomarks
	q3map_surfacelight 12000
	surfaceparm trans
	q3map_lightimage textures/myfirstmap/model_bulb.tga
	q3map_forcemeta
	{
		map $lightmap
		rgbGen identity
		blendfunc gl_dst_color gl_src_color
	}
	{
		map textures/myfirstmap/model_bulb.tga
	}
}
When you make .pk3 with .md3 model, you should not include the .md3 and .qc files - these are "baked" into compiled map.
You must however copy and textures to the correct folder in mapobjects directory.
That's why paths to the texture in shader are different to the rest of your textures. The two most important parts of the shader are:
q3map_surfacelight 12000
This will add light itself - the value means the light intensity. There is no "proper" value - you have to modify it, compile map every time, until you are satisfied with the final effect.
q3map_lightimage textures/myfirstmap/model_bulb.tga
This will modify light colour to match the sky's one. You need to add path to your sky texture. This is optional. Default light colour is white.
Let there be light!
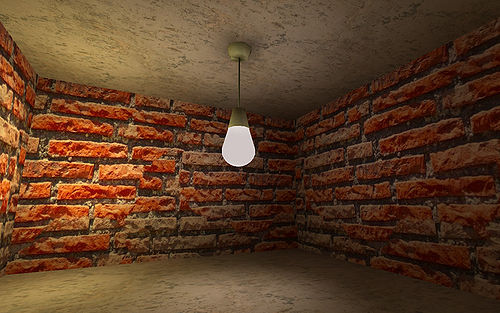
Final effect in game will look like this:
